One question I get asked often is how to add a logo to the Genesis header. To add an image logo to your header you ideally would want access to sever files through FTP. However, it is entirely possibly to do with without FTP access by using the media library and the admin file editor in WordPress, though I do not recommend tis way.
Step 1: Create your logo
I would guess most of you have already went ahead and completed this step even before reading this tutorial, but you never know. Anyways, make sure to have your logo handy and sized appropriately. In the default child theme the title area is 350px x 90px, but feel free to create the logo as big or little as you want it.
Step 2: Upload your logo
Have your favorite FTP tool? Open it up and navigate to your images folder in your child theme. Upload your logo to this directory and make sure to remember the name of the file.
Filezilla or Cyberduck are good FTP browsing apps.
Step 3: Update Settings
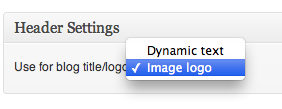
To ready the area for the logo make sure to update Genesis header settings to ‘Image logo’. This adds a class to the body of ‘.header-image’ to allow us to style the title area specifically for use with an image logo. If you don’t see this setting it is possible you are using a header background, and this option is unavailable (In the future I may update or write a new post to how to add a logo with a header background).
Step 4: Modify style.css
This step may vary depending on your child theme, but the idea is the same.
In your child theme’s style.css you would want to find the lines below or similar.
/* Image Header - Partial Width------------------------------------------------------------ */.header-image #title-area,.header-image #title,.header-image #title a {display:block;float:left;height:90px;overflow:hidden;padding:0;text-indent:-9999px;width:350px;}.header-image #description {display:block;overflow:hidden;}
If you can’t find anything similar in your child theme feel free to add it yourself. The CSS above is actually taking the text from the site title area and pushing it off-screen. There are also many ways of accomplishing this, but for this tutorials lets just use what we have. So, long as this CSS now is in your theme, where you saw your header text before it will be blank. To get your logo to appear we need to set the background of this area to the logo you uploaded in step 2. To do this add the lines below making sure to ‘update your-logo-filename.png’ yo your filename.
.header-image #title a {background:url('images/your-logo-filename.png')no-repeat;}
If your logo is bigger than the default size make sure to tweak the height and width of your title area.
Note: If adjusting width wider than the 350px default you may also need to update ‘#header .widget-area’.
Step 5: Final Word
Taking a look at your site now you should see your logo in all magnificent glory. If not don’t panic or be frustrated. Make sure to go over the past steps, and that the path to your logo is correct. If it needs some minor tweaking to fit in the area inspect it with firebug or your browser’s built-in inspector and play with it till perfect.